2021
Skills Feature :
Let Us Spray - part 4: Jane Hay
by John Doyle
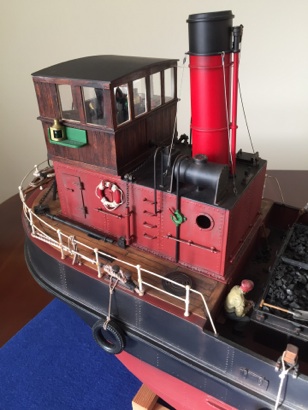
This account of painting and weathering the puffer JANE HAY demonstrates many of the techniques in parts 1 to 3. It shows how painting and weathering can really bring a model to life.
Resources:
Useful Books:
The Clyde Puffer Dan McDonald
PuffersGuthrie Hutton
Steam Coasters and Short Sea Traders Waine and Fenton
Suppliers of specialist items used:
Jelutong Wood www.wood-supplies.com
Vallejo & Tamiya Paints, Masking tapeswww.scalemodelshop.co.uk
Walnut Dowel www.cornwallmodelboats.co.uk
Turnbuckles / Pulleys / Rigging Thread www.scoonie-hobbies.co.uk
Miniature D Shackles, Nuts/Bolts,
Stainless Steel Wire etc. www.prime-miniatures.co.uk
Caldercraft Navigation Lights / Becc Decalswww.maritime-models.co.uk
Birchwood Casey Brass Blackwww.amazon.co.uk
Crew Figureswww.deansmarine.co.uk


Introduction


The following is not a blow-by-blow account of the build, but will mainly focus on its painting and weathering, covering the paints used, the use of weathering powders and washes, plus ‘clear’ and oil paints, along with some airbrushed weathering effects. I have also included a few tips, techniques, and comments that I hope others might find useful.
This model is of a 66ft Clyde Puffer, built over several months from the Mountfleet Models, 1/24th scale ‘Highlander’ kit. However, I think the term ‘kit’ here needs to be clarified. For those whose youth was spent sticking the pre-shaped plastic bits of Airfix Kits together, safe in the knowledge that part 1a will fit nicely to part 2b and so on without much trouble (except for the initiation into polystyrene glue sniffing), you will be sorely disappointed.
Mountfleet Model Kits are certainly not ‘Kits’ of complete and ready to stick together parts variety. You get a hull, superstructure and ships boat moulded in fibreglass, plus various bundles of wood and dowel to make things from. There are sheets of pre-printed and plain ply, lengths of wire, plastic waste pipe (for funnel), propellor, prop shaft, pre-coloured cloth for the hatch cover, anchor chain, rigging cord etc., plus some crew figures, and a large amount of cast metal parts.
Many of the cast metal parts however, are not as crisp as they could be. Some were completely discarded or were remade with brass for strength. Alternatives such as better navigation lights, miniature working turnbuckles, D shackles, pulleys etc. were sourced elsewhere from model shops and specialist fittings suppliers.
Some of items provided did not match up with the dimensions as given in the building instructions (which are vague in places), or on the included ‘full size plan’. For example; the hull at the bow is not symmetrical, yet the plan and the dimensions given in the building instructions for certain tasks working back from the stempost are based on it being symmetrical. My advice is to measure and check several times. What you can expect during the build is a lot of fettling and head scratching.
That said, with care and patience (plus some background research on the actual vessels), these kits can build into excellent, possibly even museum standard models. This Puffer is my second Mountfleet kit. My first being their Boston Typhoon 1/32nd scale side trawler with which, some years ago, I won the MPBA National Championships in ‘Kit Class’.
One final word of warning though. The Puffer when ballasted down to a reasonable waterline level is heavy and I mean very - very heavy. It hits the scales at 2 stone in old money!!
That said, did I enjoy the build and the final result? Oh yes – very much!

Hull and Superstructure
The fibreglass hull as supplied was warped in that the keel was bowed upwards as though it was hogging. To flatten this a fairly thick appropriately shaped ‘plank’ was glued inside the bottom of the hull and was suitably weighted down while setting. Here I used Evo Stick Strong Stuff - an all-weather ‘No More Nails’ type adhesive. It is waterproof when set and has good ‘grab’ qualities. It proved excellent for this and other tasks including gluing down the decks to coaming strips etc.
With the decks fitted (but not planked), I primed the hull and fibreglass superstructure with two coats of Halfords Yellow Filler Primer, sanding smooth between coats. This was followed by coats of Halfords Acrylic Grey Primer, again lightly rubbing down between each coat with Halfords Contour Sanding Sponges and lots of water.
Note: For metal parts, and brass in particular, I use Halfords Grey Metal Primer as this etches itself slightly into the metal for better paint adhesion.
For the colour coats, Halfords Red Acrylic Primer was used for the lower part of the hull, inside the bulwarks, decks (again not planked), and the superstructure sides. When masking the hull to paint above the waterline, I started by using 6mm wide Tamiya Masking Tape, it is very thin thereby reducing the chances of a paint ‘ridge’. It can follow the hull contours, plating detail etc. easily. Ordinary masking tape was applied onto this roughly on the centre line, with sheets of copying paper used to mask off the rest of the hull.
Note: Tamiya also produce a very thin tape specifically designed to go around complex compound curves if needed.
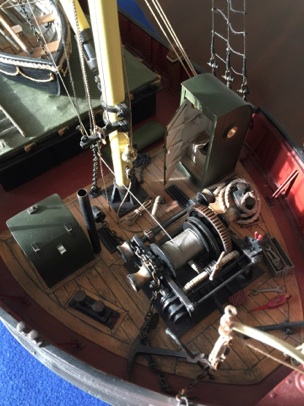
For the upper hull and all the black painted areas of the model such as funnel top, wheelhouse and superstructure roofs, winch, ships boat, hatch sides etc., I used Games Workshop Chaos Black aerosol. This produces a fine finish with a very slight sheen.
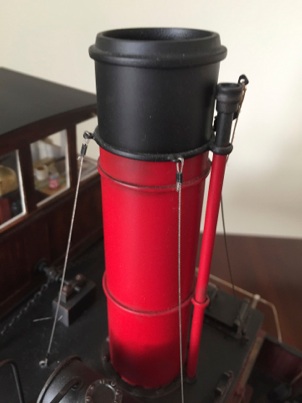
Suitable Halfords Acrylic Car Paints were selected to spray the red of the Funnel and the yellow on the Mast and Derrick. These paints do however have a gloss finish.
Note: Whilst on the subject of the funnel and mast, I used 1mm dia. steel cable for the mast stays and thicker forestay. For the winch cable, funnel stays, thinner forestay etc. 0.5mm dia. was used. I replaced the dowel supplied for the mast as it was of poor quality, with the 6mm dia. dowel for the derrick replaced with aluminium tube (B&Q in both cases).
To overcome the different paint finishes now applied, towards the end of the build and before some final detail items were added, the model (excluding windows, the wheelhouse sides and lower hull) was sprayed overall with Games Workshop Munitorum Varnish. This produces an even, but very slight sheen throughout.
I did not spray the varnish onto the red hull bottom as I wanted this to remain very matt and not be slightly darkened through the application of the varnish. This gives a nice variation in the red colour to the bulwarks, decks, superstructure etc.
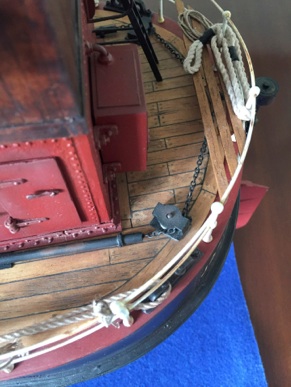
Deck Planks, Wheelhouse, Hatch Covers
I decided not to use the printed plank overlays as provided in the kit, for whilst the overlays are symmetrical, the hull at the bow, as mentioned earlier, is not. The difference would be very noticeable. In addition, the overlays had marks in the wood making their origin as single pieces of ply very obvious.
I obtained thin sheets of Jelutong wood as it has a fine grain and a light colour, cutting these into planks as required.
Walnut dowel of 1mm diameter was used to represent the deck nails of each plank. A jig was made to drill the required holes in each plank. I glued thin black card between each plank to represent the caulking, and the planks were glued to the decks with waterproof PVA. When sanding the planked deck down it starts off looking a mess, but don’t be put off, it will be fine.
Jelutong was also used to completely remake the wheelhouse sides using the supplied printed ply parts as basic templates. I did however use the ply provided in the kit for the hatch cover planks.
Whether to Weather?
Weathering a vessel is down to personal taste and what might be seen on an actual example. I suspect you would not expect to see any weathering on a model of say, the Royal Yacht Britannia! For the lesser spotted Puffer species, my aim was the atmospheric look of a vessel that is worked hard, but not a neglected ‘rust bucket’.
Acrylic Paint Washes
For the initial colouring and some weathering of the deck planks I used Agrax Earthshade (brown) and Nuln Oil (black) washes from Games Workshop. Washes are in essence highly thinned acrylic paints.
If required, further coats of washes can be applied to get colour variation. The washes can be thinned down with water even further, mixed together before applying, or mixed on the model itself to achieve varying weathered / soiled effects.
The black wash can also be used to achieve that ‘greyish’ colour that older wood gets. I used this technique on the hatch cover planks.
Note: When colouring wood it is best to apply the colour before any glue gets near, otherwise the washes will not take over any glue residue.
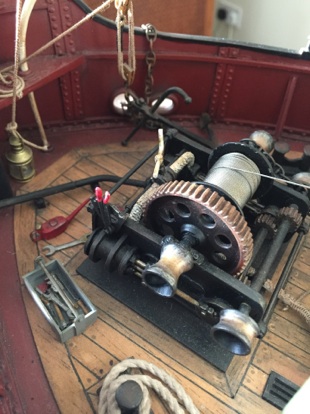
Note: You can also use the black wash over a silver painted item to get a ‘steel’ look, or use the brown for that oiled, greased look. I even used the brown wash to darken the rigging thread.
Oil Paints for wood effects.
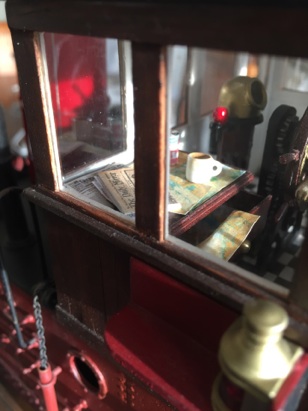
With the wood used for the wheelhouse planks being quite thin, I did not want to use a traditional wood stain / dye to colour the outside. These could have penetrated through and spoilt the white interior. I prefer to use oil paints straight from the tube as various effects can be achieved by applying a little with a small brush here and there, then spreading it around with a cloth or finger. For the wheelhouse I used Burnt Umber. If you want to represent mahogany use Burnt Sienna.
Inside the wheelhouse, there is a chart table with drawers which I scratch built from white styrene sheet. For the mahogany finish, this was first sprayed with Halfords Acrylic Red Primer, then Burnt Sienna was applied.
The same overall technique can be used on other items such as making the cast metal ships wheel look like wood. Here, spray with a white, or red primer then apply the appropriate oil paint colour depending on the ‘wood’ effect you wish to achieve. For lighter shades of wood try a white primer then Raw Umber or Raw Sienna.
Note: Oil paints take a while to dry, leave items for at least a few days. Once dry, they can be coated with a varnish, I used Humbrol Gloss.
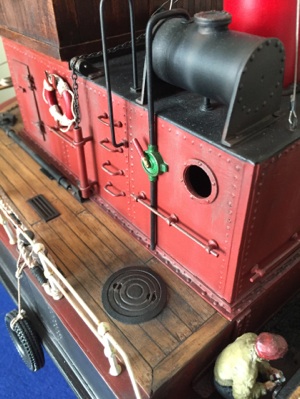
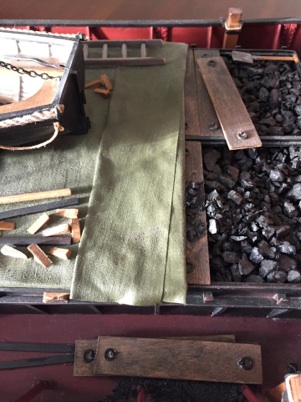
Weathering Powders
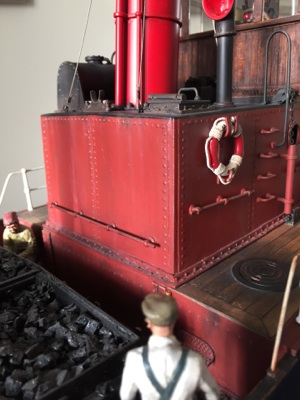
I used a variety of Humbrol Weathering Powders on this model: Rust, Iron Oxide, White, Soot, Dark Earth, and Chrome Oxide.
These powders can be mixed with water, Humbrol Decal Fix or Humbrol Varnish depending on the effect you are after. The series of instructional videos on the Humbrol web site is well worth a look. The powders can be mixed together to achieve different colours, but on the model the powders were applied dry, straight from the jars.
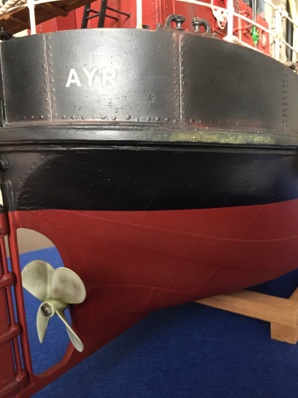
These powders are ideal to achieve weathering effects such as the soot and coal dust around funnel bands and around coaling scuttles. Dark Earth is useful for general grime in corners etc. I used a little White to represent water streaking on the superstructure. The Chrome Oxide was used for the green discolouration on the propellor and the scuffed wood on the rubbing strakes.

As the powders are water soluble, they need to be ‘fixed’ with a varnish. DO NOT BRUSH but spray the varnish on to seal them. You may need to over egg the initial application of powder as the varnish will slightly dilute the effect. Before fixing, on non-porous surfaces if you are unhappy with your results you can wash the powder off and start again. You can also build up effects by applying one colour, fixing it, then applying another colour on top etc. This is particularly useful for rust effects.
Rust effects using Acrylic paints
These can be brushed or dabbed on with a sponge to create specific rust spots such as on railings, ladders etc. When thinned down they can be ‘run’ into corners or around fittings (known as a ‘pin wash’) to give a hint of rust here and there. When airbrushed, very subtle effects around hawse holes, on chains, around fittings etc., can also be achieved.
A very useful set of paints is the Vallejo Rust and Chipping Effects Paint set. This includes various shades of rust-coloured paints, a red brown primer and a varnish. The set also includes a chipping medium as another way to achieve the look of say, steps or railings that have been chipped and now rusted. However, the chipping medium does require the use of an airbrush to apply the final paint coat over it.
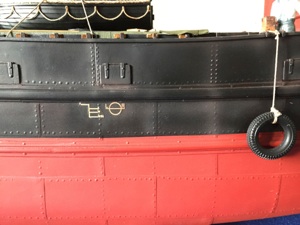
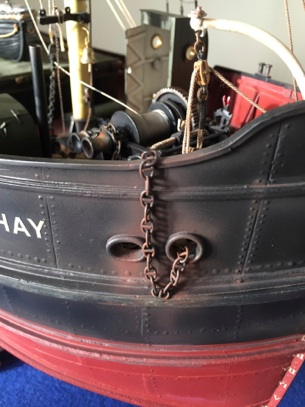
To highlight / emphasise the hull plates I lightly airbrushed some thinned Vallejo Red Brown Primer and some Vallejo Nato Brown around the hull plate edges. Finally, in the general centre area of each plate, I lightly airbrushed some thinned Vallejo Acrylic Black. This brought back some of the black colour and being matt, also gave a weathered look to the upper hull plates.
Other aerosol paints used
Green for loo on deck and Companion Way:Tamiya Olive Drab
White for the railings, inside of ships boat etc: PlastiKote Matt White
Brass for navigation lights, compass binnacle etc:PlastiKote Brass
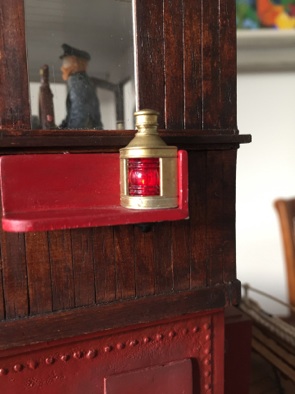
Clear Paints
These paints come in a variety of colours and are mainly used for colouring the clear plastic parts in model car kits, such as the indicator and stop light lenses. I used Tamiya green and red clear paints for colouring the navigation lights. As with all Tamiya paints, don’t forget to stir well!
Blackening the Brass bits
Many of the replacement items that I made or bought in, were in brass. There is also a lot of brass chain used. These need to look like iron. However, rather than paint these black I chemically blackened them using Birchwood Casey Brass Black. The process is very easy. Simply immerse the brass part/s in the liquid until they turn black, remove, rinse with water, then let dry.
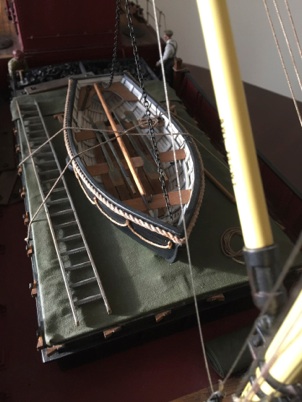
Hatch Tarpaulin
I replaced the supplied, pre-coloured cloth with a much finer cotton cloth. I cut a piece of this cloth larger than needed and an even larger piece of cardboard, I stretched some cling film over the cardboard to protect it from what comes next and taped the cloth down at the corners on it. I diluted some waterproof PVA adhesive at least 50/50 with water. Then brushed this on until the cloth was fully covered and wet through. It was then left to dry. When fully dry and still on the board I sprayed on the grey primer. This was followed by Tamiya’s Olive Drab 2 aerosol.
Once all was dry the ‘tarpaulin’ was easily cut to size without the edges fraying. It was then glued down onto the hatch, again with waterproof PVA glue. As I did so the underside of the cloth softened slightly allowing it to be easily moulded over any edges and around corners.
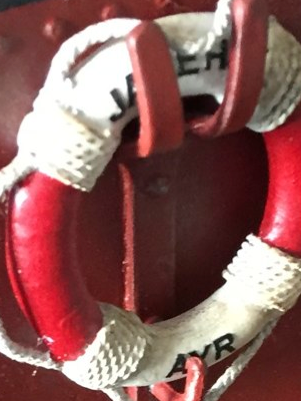
Hull, Derrick, and Lifebelt Lettering
I used various lettering sets from the Becc Transfer range. These are actually stick-on vinyl letters and numbers. I found the 1.24th scale depth markings too large using those for 1.48th scale instead.
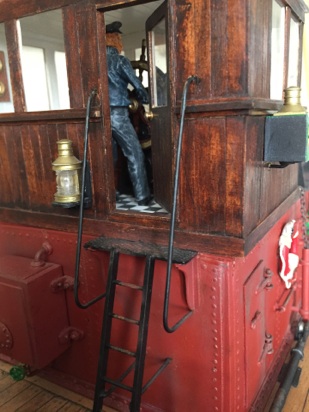
Crew
I felt that the 3 crew figures as supplied were too ‘cartoonish’ and oversized. I therefore recruited replacements from the Deans Marine 1/24th scale range of figures.