2020
Build Feature :
SMIT LONDON by Ken Ireland
Christened SMIT LONDON, the tug was renamed SMITWIJS LONDON in early 1998, then simply LONDON, from mid-2007. In 2013 she was again renamed, this time to GLOBAL CHANGE. This muscular tug was scrapped in 2014. Given the focus of the SMIT company (taken over by Royal Boskalis Westminster in 2010), the tug was used in many ocean rescue missions and played an important part in building and maintaining the reputation of SMIT International.
Length: 75 metres
Tonnage: 2273 tons
Engines: 22000HP (2 x 11000HP).
Top speed: 16.5 knots
Making this the largest and most powerful tug in the world, at launch (and for many years afterwards).
Ken served in the Merchant Navy all his working life, beginning when he left school at 17.
At 22, Ken bought the Billings 1/75 scale kit of SMIT LONDON from a model shop in Gourock, and began the build. But marriage and the nature of a life at sea meant the model was docked in the attic for many years.
However; retirement, and the Covid Lockdown meant Ken was able to revisit the model and pick up the threads of the build once again.
Building started (again) in March, and has continued until now (December 2020), with most work completed.
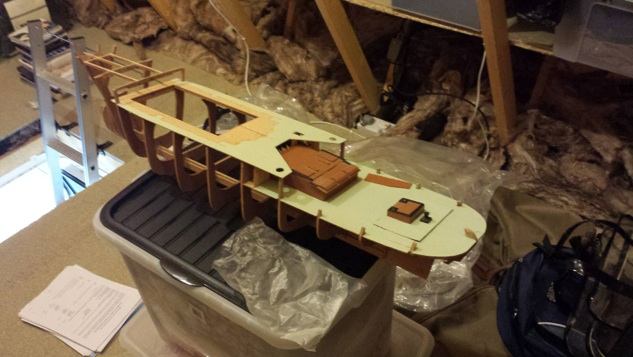
The model’s hull is constructed using plywood frames skinned with balsa strips, and therein lay the usual challenge of fitting the planking around the stern and the bow - difficult for an expert, never mind a beginner. Perseverance and patience pays dividends with this aspect of the build.
The geometry of bow and stern usually means there are compound curves in those areas. Using a sheet is a non-starter, because even a thin sheet of plywood cannot bend in two directions simultaneously; so planking is easier to persuade - and even easier if the plank is not too rigid (like soft balsa) and can be made even more flexible by steaming, or using strong glue, brute force, and plenty of pins.
On this model, the the overhung portion of the stern does not lend itself to horizontal planking, and although some modellers might use vertical planking, that little radius at the bottom is tricky to deal with. In this case, Ken used carved blocks, which is not only a good choice of technique but gives strength and a degree of impact resistance, which is useful on a tug.
Resources
Billing Boats :
Billing’s main site: https://www.billingboats.com
various dealers in the UK:
and many more.
Billings on FaceBook: https://m.facebook.com/billingboats/posts
Information:
about SMIT INTERNATIONAL: https://en.wikipedia.org/wiki/Smit_International
and https://www.smit.com/#view/map
photos of the tug: http://www.shipspotting.com/gallery/photo.php?lid=683589
Named and christened on 8th October 1975, in London, SMIT LONDON was one of a pair of tugs (the other being SMIT ROTTERDAM). These sister ships were each equipped with two 11000HP diesel engines, and were, at the time, the most powerful tugs in the world.
Billings make good kits, but SMIT LONDON is hardly a beginner’s project, and Billings’ instructions are fairly minimal, so Ken sought further information, hints and tips, and instruction on the Billings Facebook page.
The most memorable of these tips was to make the jolly boat covers from Lurpak butter tub foil covers. Painting these matt green gives a realistic rendition of a canvas cover.
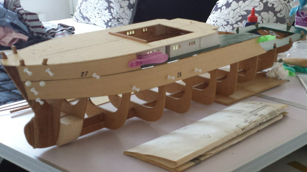
Note the use of large-headed pins to secure the planks in this picture of Ken’s model at the planking stage. Pins allow a degree of trial fitting, which is essential not only for positioning planks, but for ensuring they are accurately trimmed to fit snugly at the bows. Some folks like to use a carved block at the bows, but here Ken is using the more demanding all-planked approach with the intention that careful attention to the lay of each plank will produce a flowing surface.
Easier said than done...


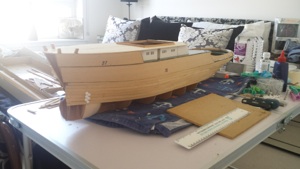
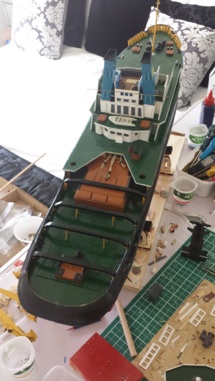
The upper portion of the sides of the boat are planked using relatively broad strips where the sides are almost vertical. The decks, too, are formed using the same ply sheet, with the multi-level decking adding to the visual appeal of the vessel, as well as being faithful to the original. There is always the choice of when to paint the various parts of the developing structure, and on this model Ken has chosen to paint the deck before much detail is added.
The beautiful curves of the stern are apparent here, and that rear hatch will allow access to the rudder control arms.
The superstructure on the mid-level deck has already been painted, avoiding the problem of trying to get a spray pattern or a paint brush under the overhanging edge of the upper deck at a later stage.

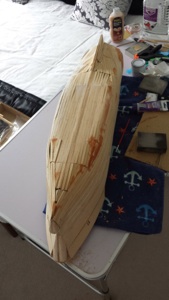
Although the sides of this vessel are not far from being straight, and only a little off the vertical, the relatively sharp small radius turn from the sides onto the bottom of the hull presents a considerable challenge. As usual, there is not only a radius running from the sides to the bottom, but that radiused edge is not straight. This represents a real challenge for planking, and demands narrow planks capable of persuasion to allow anything like the composite curves required at the transitions from bottom to bow and bottom to stern.
Once the whole area has been planked, the curves are smoothed off by sanding carefully.
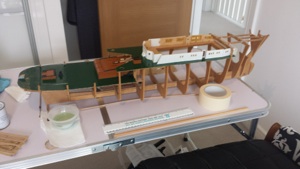
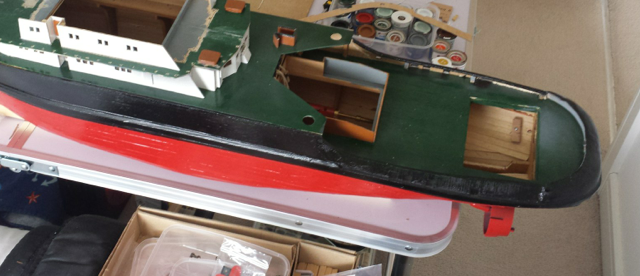
In the photo above, the hull is completely planked, and has received an undercoat.
Undercoat not only provides a protective base coat for the following coats of paint, but shows up areas where the planking is not entirely smooth. That allows remedial sanding before reapplying undercoat. This can be a lengthy process, but one which demands care, as it is only too easy to end up with a thin hull. One common technique is to apply filler to the low areas to bring them up to the level of the surrounding sections of the hull. That tends to reduce over-sanding.
The photo below shows the hull after a top coat of red. Ken didn’t like the recommended shade of red, and, having by this time joined Ayr Model Boat Club and examined members’ models, he preferred the colour of the more common Halfords’ Red Oxide primer. At the moment (post-completion) he is respraying the hull with that more authentic shade.
Like the undercoat, the red top coat can reveal areas of the hull which could have benefitted from more attention, so it is always worth taking time over the initial undercoat stage to eliminate as many lumps and bumps as possible before progressing to the top coats.
Note the extensive masking of the areas not to be painted. Again, this is a little tiresome when the builder is desperate to make rapid progress, but effective masking, as carried out by Ken, always saves time at later stages.
The photo above shows the hole at the bow for a bow thruster, and the Kort nozzle at the rear. Propulsion involves two Kort nozzles, one on each side of the keel, at the rear. These nozzles are fixed, but there will be a rudder immediately behind each nozzle, for steering.
The next photo shows the model at a more advanced stage of painting.
The hatch amidships allows access to the prop shafts at the universal joints between motors and shafts. The model is powered by two Mabuchi 555 motors, each controlled by a Marine 50 Amp ESC (Electronic Speed Controller) matched to a brushed motor, to suit the Mabuchis.
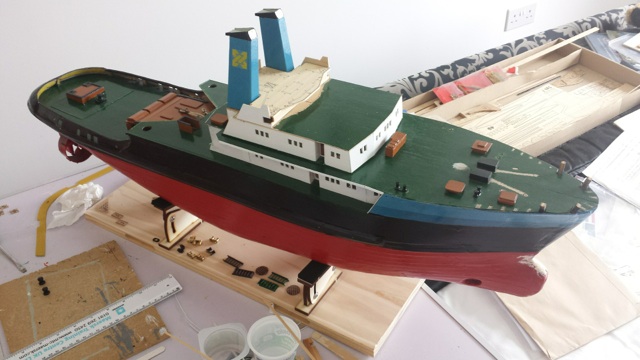
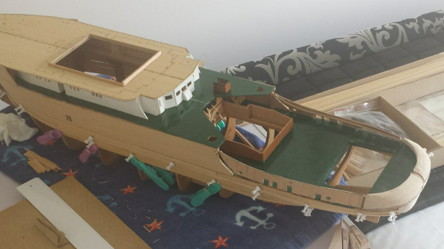
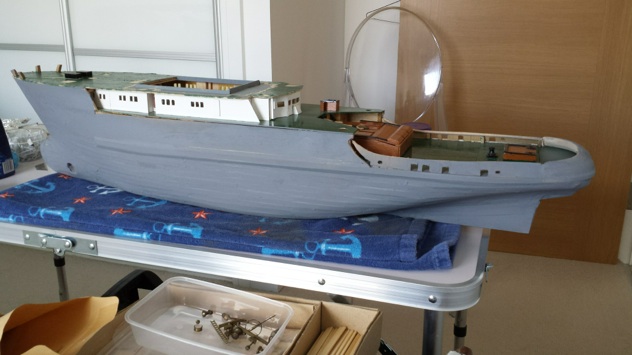
Adding superstructure and other structural details always brings a model to life, and the next photo shows the funnels, roof, deck hatches and some other deck fitments.
These have been assembled and painted before adding to the model, and the additional colours add to the sense of realism to what is already a handsome boat.
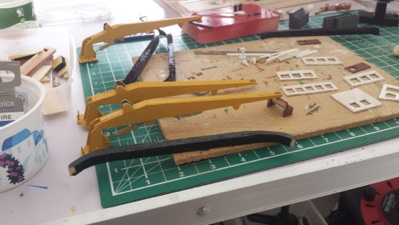
A key feature of this tug was the cranes, shown here assembled and painted a fetching yellow. These are static items on this model.
The black curved item at the front of the photo is a lateral deck rail to aid towing and the management of ropes and chains. The photo on the right shows all four of these in position. With a tug as powerful as SMIT LONDON, it is important to have strong designated attachment points, rather than attaching a pulling chain to, say, a handy spot on the bulwark and finding that the act of towing pulls side plates from the hull...

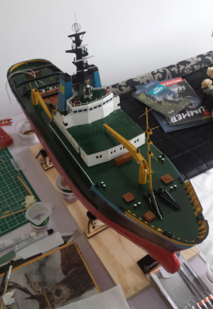
Adding further detail helps bring the model to life, and the job is completed by the installation of the masts.
There remains only the railings, which Ken is currently adding. The brass rod supplied in the kit has proven to be too stiff, so Ken has substituted 30 amp fuse wire, which looks more authentic and is easier to manipulate.
The model is controlled by a Planet TS2+2 radio controller on 2.4GHz.
This is a 2 channel transmitter with 2 auxiliary channels.
A 6 channel receiver is fitted inside the model, although not all channels are in use.
Steering is via a Futaba HS311 servo, with the rudders acting in tandem.
The model is powered by two 6 volt 4 amp/hour JP power cell batteries, to allow a decent length of sailing time.
It is worth adding that the hull was sealed inside with PVA. Sanding Sealer was used initially, but that did not provide a complete seal. PVA does the job. Other common methods are to cover the hull inside and out using tissue or fine glass cloth, but that is perhaps something for the next model.